
- All
- Product Name
- Product Keyword
- Product Model
- Product Summary
- Product Description
- Multi Field Search

Views: 0 Author: Site Editor Publish Time: 2026-07-31 Origin: Site


In architectural design, ceiling topography dictates the visual flow of a space just as much as the floor plan. The specification of lighting systems controls not only the illumination levels but also the physical continuity of the ceiling plane. Architects, electrical contractors, and facility managers constantly navigate the tension between high-end aesthetic ambition and practical, on-site execution. Specifying a completely seamless ceiling often introduces hidden labor requirements, demands strict drywall tolerances, and creates long-term maintenance liabilities that clients rarely anticipate.
This guide delivers a technical evaluation of trimmed versus trimless linear lighting systems. We break down the structural differences, installation realities, and maintenance risks associated with each mounting method. You will see exactly how structural choices impact project timelines, trade coordination, and future accessibility. The following sections dissect the mechanical realities of each system, giving you the field-tested data needed to specify the right fixture for your project's specific structural and operational requirements.
A Trimmed Recessed Linear Light relies on an extruded aluminum housing equipped with an integrated, overlapping flange. This flange, often called a bezel, acts as a visual and physical buffer. It completely covers the gap between the fixture housing and the rough ceiling cutout. The fixture secures directly to the ceiling joists, blocking, or grid system using adjustable mounting brackets. It remains visually and physically separate from the drywall finish.
This structural independence is a massive advantage in the field. It allows the ceiling material to expand and contract with seasonal humidity changes without transferring stress to the fixture housing. The flange hides jagged drywall cuts, over-cuts, and minor alignment errors. Installers do not need to achieve a perfect cut. The overlapping metal provides a clean, factory-finished edge every single time. We typically see flange widths ranging from 3/8 inch to 3/4 inch, which provides ample coverage while maintaining a low profile against the ceiling.
From a mechanical standpoint, the trimmed housing usually features a drop-down gear tray. The LED boards and drivers mount to this tray. You release a couple of clips, and the entire internal assembly swings down on safety tethers. This gives technicians full access to the wiring compartment without ever touching the finished ceiling surface.
A trimless linear light utilizes a completely different mounting philosophy. Instead of an overlapping bezel, it features a perforated or mesh mud-flange. Contractors embed this flange directly into the ceiling material. The installation requires applying multiple coats of drywall compound over the perforated flange, feathering it out, and sanding it perfectly flush with the fixture's inner edge. This creates a zero-sightline transition where the ceiling appears to flow directly into the light channel.
Once the mud cures, the fixture becomes a permanent, integrated component of the ceiling architecture. The housing cannot move independently of the surrounding plaster. If the building settles or the ceiling framing shifts, the rigid connection between the aluminum housing and the drywall compound can experience stress. This is why trimless installations demand rigid framing and high-quality setting-type joint compounds to prevent hairline cracks along the fixture edge.
The internal mechanics are also tighter. Because there is no outer flange to hide a large access panel, the internal components must fit through the exact width of the light channel. Lenses sit flush against the mudded edge, requiring specialized suction tools for removal. You cannot simply pry the lens out with a screwdriver, or you will chip the delicate plaster edge.
Micro-trim systems bridge the gap between the two traditional methods. They feature ultra-thin bezels, typically measuring 1mm to 2mm in width. They offer a minimalist profile that closely mimics a trimless installation from floor level. This design completely eliminates the mudding, taping, and sanding stages required by true trimless fixtures.
Contractors cut the opening, wire the fixture, and push it into the ceiling. The micro-flange covers minor cutting imperfections without requiring wet trades. It preserves a clean, contemporary sightline while keeping the installation path simple and fast. While it does not provide the absolute zero-sightline of a mudded fixture, it removes the massive labor burden and future cracking risks associated with plaster integration.
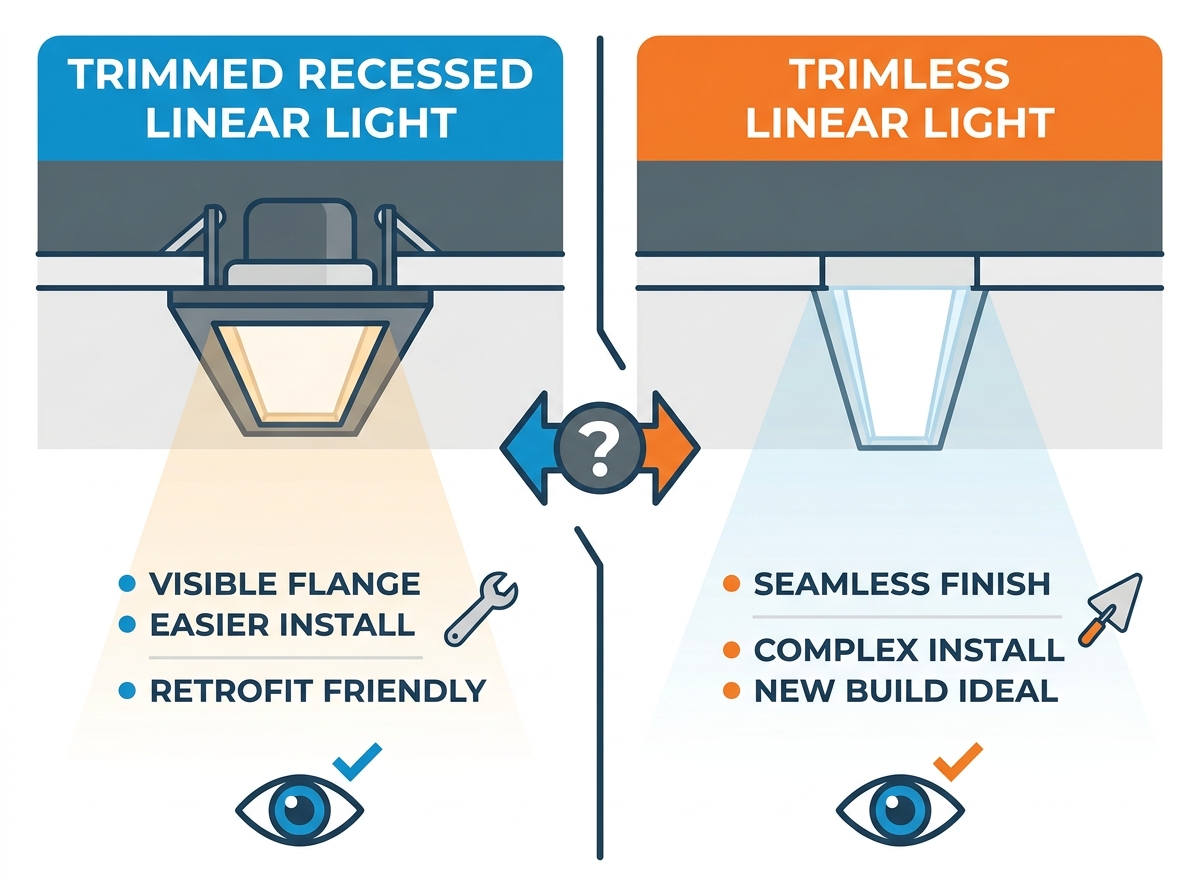
Trimless installations deliver minimalist, uninterrupted ceiling planes. They dominate high-end residential spaces, art galleries, and flagship retail environments where architects want the ceiling to appear monolithic. Deep-regressed light engines in trimless fixtures help minimize glare by hiding the light source high up in the channel. The light simply pours out of a clean slot in the ceiling.
Conversely, trimmed fixtures introduce a distinct architectural line. Experienced designers leverage this line as a deliberate visual element rather than trying to hide it. You can specify contrasting black trim against a crisp white ceiling to create bold modern linear lighting designs. Alternatively, you can use factory color-matched flanges that blend subtly with the ceiling paint. The flange provides a crisp, perfectly straight boundary that defines the light channel.
Optically, trimmed fixtures often utilize flat, diffuse lenses that sit flush with the flange. This provides excellent wide-beam illumination, pushing light out evenly across the space. The visible trim also helps block stray light from bleeding into the ceiling cavity, ensuring all lumen output is directed downward into the room.
The labor workflow is where these two systems diverge drastically. Trimless installation requires seamless, overlapping coordination between electricians and drywallers. If these trades are misaligned, your project schedule will suffer.
Trimmed installation is highly forgiving and isolates the trades. The drywall crew finishes and paints the ceiling completely. Then, the electrician cuts the drywall, wires the unit, and snaps the fixture into place independently. The flange hides minor cutting errors. There is no waiting for mud to dry, no sanding dust inside the fixture housing, and no risk of the painter spraying the LED boards.
Ceiling composition dictates your lighting options. You cannot force a trimless fixture into a ceiling that cannot accept joint compound. Both styles work in standard drywall, but trimless requires rigid framing to prevent hairline cracks. Building settling easily damages mudded flanges if the framing flexes.
For acoustic drop ceilings (T-grid), trimmed fixtures are the absolute standard. Trimless is generally incompatible with T-grids without specialized, high-cost modifications that defeat the purpose of a modular ceiling. Wood, metal, or slatted ceilings heavily prefer trimmed fixtures. You cannot apply drywall compound to wood or metal panels, making mud-in flanges useless in these applications.
| Ceiling Material | Trimmed Compatibility | Trimless Compatibility | Installation Notes |
|---|---|---|---|
| Standard Drywall / Gypsum | Excellent | Excellent | Trimless requires Level 5 finish and rigid blocking. |
| Acoustic Drop Ceiling (T-Grid) | Excellent | Poor | Trimmed fixtures drop right into standard grid layouts. |
| Wood / Slatted Ceilings | Excellent | Incompatible | Flange covers rough wood cuts perfectly. |
| Metal Panels | Excellent | Incompatible | Requires precise cutting; trim hides the metal edge. |
| Plaster (Historic Retrofit) | Good | Poor | Vibration from cutting plaster makes trimless risky. |
Maintenance workflows differ drastically between the two systems. For a recessed ceiling light with a trim, lenses remove easily with a simple plastic pry tool. The drop-down mechanism allows unobstructed access to drivers, emergency battery backups, and LED arrays. Technicians never touch the ceiling finish. They can swap a dead driver in five minutes and move on.
Trimless fixtures require specialized suction tools to remove the lens. You must pull straight down with even pressure. Internal access is tighter. Replacing the entire housing is impossible without cutting and re-patching the drywall. If a trimless housing gets damaged by a water leak or structural shift, you are looking at a major drywall repair job.
Upgrading components to smart lighting modules is straightforward in trimmed architectures. You have room to push wireless controllers (like Caséta or DALI nodes) through the rough opening into the ceiling plenum. In tight trimless housings, you often lack the clearance to push external modules through the mudded opening, forcing you to locate smart drivers in remote, accessible junction boxes.
The primary risk of trimless fixtures involves physical damage during routine maintenance. Prying out a tight lens or internal tray can easily chip the surrounding plaster. Even a slight slip of a screwdriver will gouge the painted edge. This requires plasterers and painters to mobilize just to repair the ceiling after a simple driver swap.
Trimmed fixtures offer superior durability. The aluminum flange protects the drywall edge from tools, ladders, and clumsy hands during maintenance. Technicians can work quickly without fear of damaging the surrounding architecture. The metal bezel takes the abuse, keeping the drywall pristine.
Base unit costs for trimmed and trimless extrusions are often similar per linear foot. The aluminum weight and LED components are nearly identical. The financial divergence occurs entirely during installation. Multiple coats of mud, drying time between coats, and precision sanding are mandatory for trimless systems. This intensive process increases installation labor significantly.
You must account for the time wet trades spend on scaffolding, carefully working around the aluminum channels. trimmed recessed lighting eliminates these steps entirely. The electrician cuts the hole, wires the fixture, and pushes it in. The labor savings on a large commercial floor plate can be massive when you eliminate the taping and sanding phases for hundreds of linear feet of lighting.
Long runs of trimless lighting can highlight uneven ceiling framing. If the joists are not perfectly level, the aluminum extrusion will follow the curve of the ceiling. This results in a wavy appearance along the light channel, which ruins the minimalist aesthetic. To mitigate this risk, specify laser-leveled framing before installation. Use rigid, heavy-gauge aluminum extrusions that resist bending. Implement heavy-duty alignment splines for continuous runs to ensure the housing remains perfectly straight while the drywall compound cures.
Trimmed fixtures handle uneven ceilings much better. The flange can flex slightly to accommodate minor variations in the drywall surface, hiding the imperfections in the framing behind the bezel.
Mudding a fixture into the ceiling reduces ambient airflow around the housing. The drywall compound acts as an insulator. This can trap heat and degrade LED lifespan over time. Heat is the enemy of LED drivers and diodes.
To mitigate thermal issues in trimless applications, specify fixtures with high-mass aluminum heat sinks. Ensure the manufacturer under-drives the LEDs so they run cool. Proper thermal management minimizes the need for future maintenance, which is critical when accessing internal components is difficult and risks damaging the plaster.
The choice between trimmed and trimless linear lighting is a calculation of aesthetic priority versus operational practicality. If speed, budget, and ease of maintenance are paramount, a trimmed fixture is the optimal choice. It protects the drywall, speeds up installation, and simplifies future service. If the architectural intent demands a zero-sightline ceiling and the project accommodates specialized labor, trimless is the standard.
A: Yes, but it is highly complex. It requires cutting a larger channel, installing the mud-flange, and re-taping, mudding, and painting the entire ceiling section to blend the finish. Trimmed fixtures are much easier and cleaner for retrofits.
A: The fixture itself may cost the same, but the total installed cost of trimmed lighting is significantly lower. This is due to the complete elimination of drywall mudding, sanding, and finishing labor.
A: Most modern trimless fixtures feature drop-down gear trays. These trays are accessible through the lens opening. This allows technicians to replace the driver from below without damaging the surrounding plaster.
A: Trimmed fixtures are highly versatile. They are the best choice for wood, metal, acoustic tile (T-grid), and standard drywall ceilings where applying joint compound is not feasible or desired.
A: They can develop hairline cracks along the flange. This happens if the ceiling framing shifts, the building settles, or if the contractor failed to use flexible drywall compound during the initial installation.
A: Flange widths vary by manufacturer. They typically range from 3/8 inch to 3/4 inch. This provides just enough coverage to hide rough drywall cuts while maintaining a sleek, modern profile.
A: Yes, but control modules must fit inside the fixture housing or sit in an accessible remote junction box. Trimmed configurations make accessing and replacing these smart modules much simpler if they require upgrading.


